
I made this cardigan for my daughter-in-law, who requires weekly IV infusions for medical reasons. She gets very cold during the infusions. I did get her a fleece hoodie that has zippers in the arms, but this is softer and cuter, I think!
She likes vintage clothing, and this pattern looks vintage.
I came up with a way to button the sleeves at the seam so it can be opened on either side as needed.
I decided to make the tutorial in case anyone else is looking for a similar solution. This would be a great gift for someone you know who needs infusions or frequent lab work as they can leave the sweater on and just open up either sleeve as much as needed.
You can also just sew the sleeve seam together if you don’t need the openings and just want to make a cute cardigan 😊
Once you become familiar with the 4 row pattern repeat, it’s really easy.
Watch the video tutorial on YouTube (at the bottom of this pattern) for help.
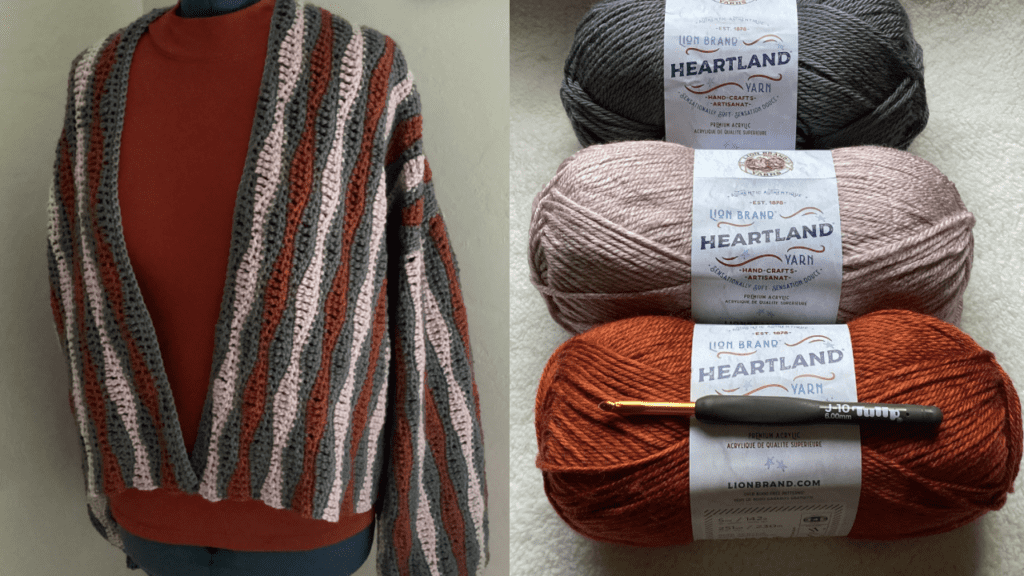
6mm crochet hook (if you can, get Tulip Etimo, it glides through yarn so smoothly!)
Lion Brand Heartland 4 weight yarn
Color A: Petrified Forest
Color B: Wolf Trap
Color C: Yosemite
You can use any color combination in a 4 weight yarn, or use all one color. It still has a nice texture to the design.
For standard women’s sizes, including lots of measurements (for example; arm length, armhole opening, bust, etc) in crochet garments, please visit:
https://www.craftyarncouncil.com/standards/woman-size
Stitches used:
Chain (ch)
Single crochet (sc)
Half double crochet (hdc)
Double crochet (dc)
Treble crochet (tr)
Sleeves: Make 2
With color A:
Ch 58 (multiple of 14 plus 2 more chains at the end of the chain) or however long you would like your sleeve to be. Mine is 18”, before the cuff is added. You don’t have to add a cuff, as the end of the sleeve has a nice finish already, but my daughter-in-law wanted one. It does work well if you’re making this with buttoned seam to hold the sleeve in place when opened.
Row 1:
Working in the back bumps of the chain for a nicer foundation (not necessary, but I love it)
Sc in the 2nd ch from the hook
Sc in the next chain.
*2 hdc (one in each of the next 2 chains)
2 dc
3 treble
2 dc
2 hdc
3 sc*
Continue this pattern from * to * until the last 2 stitches.
2 sc
Ch 1, turn
Row 2:
Sc in the very first stitch and in each stitch across.
At the end of the row, begin a sc, but drop color A before pulling through the 2 loops.
Pick up color B, pull through the 2 loops and ch 3(I include the tail in my first chain, but you don’t have to.)
Turn, no chain
Row 3:
Stacked single crochet (see video) or chain 3 if you prefer.
Treble in the 2nd stitch
2 dc
2 hdc
3 sc
*2 hdc
2 dc
3 trebles
2 dc
2 hdc
3 sc*
Continue the pattern from * to * across.
The last 2 stitches will be 2 trebles.
Ch 1, turn
Row 4:
Sc in the first stitch and in every stitch across.
Remember the last stitch will be in the top of the chain 3 from the previous row.
At the end of the row, begin your sc, but drop color B, pick up color A (or whatever color pattern you are making) and complete the sc.
Repeat rows 1-4, changing color every 2 rows. I used color A between each of the other colors, but you can make your patten however you like. Multiple colors look great, too!
You can either carry your yarn up the sides (just pull it along and put the yarn you’re not using in that row over the hook before you chain with the new color. They will be hidden when you attach the sleeve to the sweater. If you do carry the colors up the side, place the colors you aren’t using to your right to keep from getting tangled.
You can also cut each color after joining with the new color and weave in the ends later.
For a 10-10.5” armhole opening, I made 28 waves. My pattern starts with color A and has color A between each of the other colors. I ended on color C to maintain the pattern when I connect the sleeve at the seam.
You can either sew the seam together all the way down, or use buttons from the elbow down, as I’m going to do, after sewing the sleeves to the armholes.
There’s no need for a cuff, but if you want if for the design or to better hold the sleeve in place during infusions, continue to the cuff directions.
Cuff:
5mm hook
Color A
If you choose to make cuffs, join with color A and use a slip knot at the corner of the original chain (where the tail is.)
*Sc in the next 5 stitches (approximate at the end of the rows)then sc 2 together (decrease)* continue from * to * around and it doesn’t matter if you end on a sc or decrease.
Ch 1, turn
4 sc, then sc 2 together around.
Count your stitches so you can make sure your next cuff starts with the same number of stitches.
Ch 16 for a long cuff, fewer chains if you want a smaller cuff.
Sc in the 2nd chain from the hook and down, you should have 1 less sc than however many chains you started with.
Now that you’re at the bottom of the chain, don’t go in the stitch where the chain is coming out of, but in the next sc, make a slip stitch and slip stitch in the next 2 sc.
Turn,
Count your stitches on the beginning row of the cuff to make sure you go into the correct stitch at the bottom (I’ll count 15 for mine)
Sc in the back loop only of each stitch up the row until the last stitch. Sc in the full stitch. Ch 1, turn
Going back down the row, sc in the back loop only of each stitch. Make sure you count as it’s easy to miss the last stitch.
*Again, don’t go in the stitch your row came out of, but slip stitch in the next 3 stitches.
Turn, sc in the back loop only of the cuff, sc in the full stitch at the top, ch 1, turn.
Sc back loop only in each stitch down (make sure you get the first and last stitch)*
Repeat from * to * around. When you meet up with the initial chain row, fasten off at the cuff edge, leaving a tail for sewing the cuff seam together.
I find it easiest to go into the back loop of the stitch closest to me and the front loop of the stitch on the initial row, going in the stitch from the middle and out on each side. (See the video for how to sew the seams together, it’s the same idea.)
If you want to leave a thumb hole, I started the seam for about 3-4 stitches, then I wove the yarn in the next few several stitches (I tried it on to see where it felt comfortable) and then completed the seam, fastening off when I reached the edge of the sleeve. Weave in the ends.
If you want to leave part of the sleeve seam open for infusions and/or lab work:
I simple joined the yarn on the
Front panel: Make 2
With color A:
Chain 72 (for a 22“ long sweater) No border needed.
Follow the same 4 row repeat pattern for the sleeve (above).
*if you want the color pattern to match up with the back panel, when you make the 2nd front make your pattern A-C-A-B. I didn’t realize one panel wouldn’t match the back panel at the seam by following the same pattern for both front panels, but it didn’t bother me enough to remake it.
Sizes: (based on average bust size divided by 4)
XS-S: 7-8” per panel
M-L: 9-10” per panel
XL: 11” per panel
2X: 12-13” per panel
3X: 14” per panel
4X: 14.5-15” per panel
5X: 15-16” per panel
Sc around the edge where you carried your yarn up, 1 sc at the end of each of the color A rows and 3 sc at the end of each of the color B and C rows.
Back panel: Make 1 (when you place the front panels as though you are ready to sew them to the back, there should be a gap at the neckline of between 4-6”. I should have made my front panels a little narrower so I would have a bigger gap for the neck edge, but it worked out.
Chain 72 (for a 22” long sweater, every 14 chains will add about 4”)
Follow the 4 row repeat pattern for the sleeve.
Sizes: (based on average bust size divided by 2)
XS-S: 15-16”
M-L: 17-21”
XL: 22-23”
2X: 24-25”
3X: 26-27”
4X: 28-29”
5X: 30-31”
Place the front and back panels together, right sides facing each other.
Sew the shoulder seams together. (See the video if you need help.)
Mark the sides to leave an armhole opening the same size as the sleeves and sew the sides together.
Sc around the sleeve opening where you carried your yarn up the rows.
Sew the sleeves into the armhole opening.
Finishing the front edge/neckline:
For a simple finish that doesn’t compete with the wave pattern, join color A at the bottom of the left front panel corner. Ch 1, sc in the same stitch, sc in each stitch around.
Fasten off at the bottom corner of the right front panel.
That’s it, you’re done!
