Alize Cotton/acrylic blend 4 weight yarn (or any 4 weight yarn, preferably a cotton blend.)
Color: champagne
5mm hook
Ch=chain
Ch sp=chain space
SC=single crochet
HDC=half double crochet
DC=double crochet
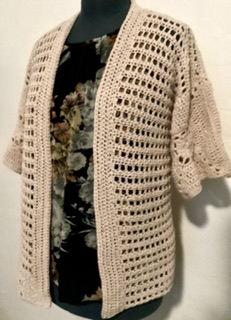
Even in the warmer months, I like to wear something on my arms. This allows me to wear sleeveless tops while still covering my arms. The yarn is a cotton blend and the stitch pattern is open, making it nice and lightweight.
I consider this fairly easy to make. The front panels are worked along with the back panel, so you don’t have to sew shoulder seams.
The sleeves are simply 2 cute granny squares sewn together and then sewn to the armhole openings.
A half double crochet edging gives the sweater a pretty, finished look.
If you have any issues following the written pattern, please watch my video tutorial on YouTube @i-crochet
All of my patterns are free. I enjoy sharing my crochet projects!
I made mine a size Large:
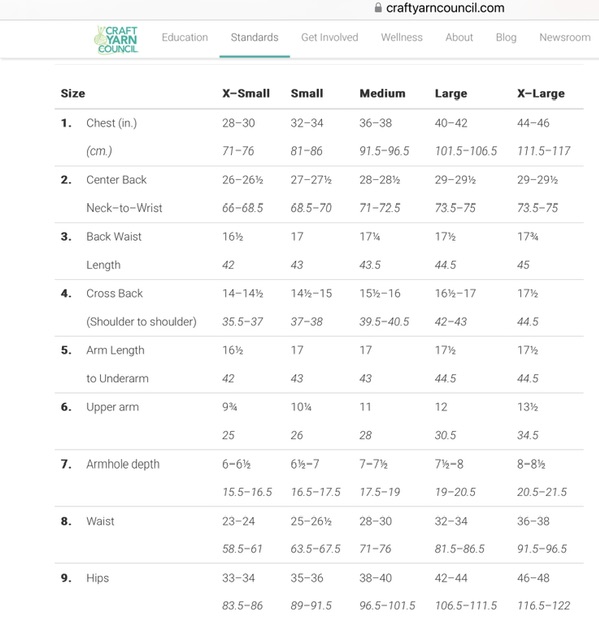
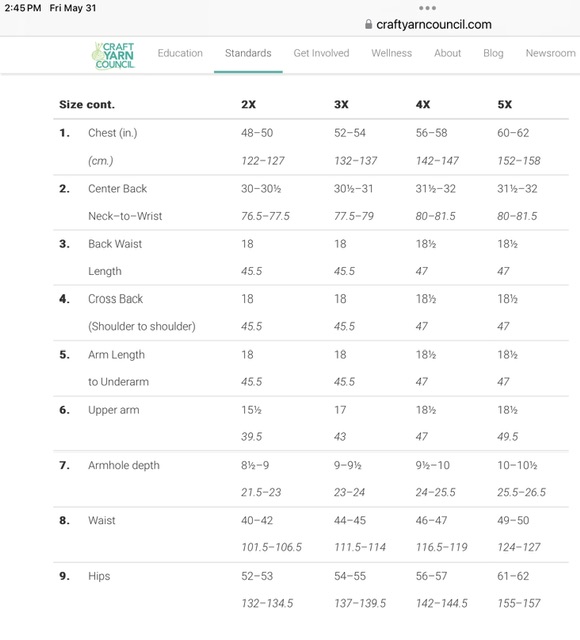
40-42” bust **see the bottom of the pattern for the Craft Yarn Council size guide for women’s sizes XS-5X
Back panel:
Chain 80 (more or less to equal half of the bust measurement) Mine measures 20”.
Row 1:
Hdc in the 2nd chain from the hook and in each chain across.
Ch 3, turn
Row 2:
Dc in the first stitch.
*Ch1
Skip 1 stitch
Dc in the next stitch*
Repeat from * to * across
The last stitch will be a dc
Ch 1, turn (I have 40 dc total, 39 squares, so whatever your initial dc row is, keep checking along the way that you have the same number of dc’s or squares as your first dc row)
Row 3:
Hdc in the first stitch
Hdc in the chain space (go under, not in, the chain)
*Hdc in the dc from the previous row
Hdc in the chain space*
Repeat from * to * across
End with a hdc
Ch 1, turn
Repeat rows 2 and 3 until the back panel is as long as you like.
The last row should be a row of hdc in each stitch to match the first row and to give more structure to the top seam.
Front panel:
Repeat row 2, but stop when you have made 15 dc’s including the first (for a large 40” bust sweater). This gave me an 8” panel, but you may want to make your panel wider or narrower. Remember to leave a space between the panels for the back neckline. My space is 6” but it could be as small as 3-4”. Any smaller and it might pull up in the back.
This won’t be a button up sweater, I just want to use it as a lightweight coverup, so the front panels don’t need to meet up in the middle.
Repeat row 3.
Repeat rows 2 and 3 until the front panel is as long as the back panel. I just matched up the squares from the front and back panels to make sure I had the correct number of rows, but you can measure or count the rows. I’m all for doing whatever is easiest.
For the other front panel, you’ll need to count over from the other side and mark where to start (however many dc’s you made on the other side, mine was 15.) You have to start from this point, not at the side or the pattern won’t match up. Start with a dc, then ch1, skip 1 and continue across, ending with a dc, ch 1, turn (just like row 2).
Repeat row 3
Continue repeating rows 2 and 3 until the panel is as long as the back and other front panel. You can measure or just match up the squares from the front and back. You’ll finish on a hdc row, just like the back panel.
Seams:
With the right sides together, (I liked my right side to be the puffier side of the hdc rows, which is actually the “wrong” side. The tail from the initial chain row is on my right for my “right” side. You can choose which side you like best to be your right side. Place stitch markers to mark the bottom of the armhole. Mine were 8” from the shoulder seam to the bottom of the armhole.
Use a tapestry needle to sew the side seams together.
Start at the bottom and stop at the stitch marker.
Sleeves: Make 4 squares, 2 for each sleeve.
Start with a magic circle.
Ch 1
Round 1:
12 sc in the circle.
Join the first sc with a slip stitch
Ch 3
Round 2:
The chain 3 counts as 1 dc and ch 1.
In the same stitch, make a dc. This is your first V stitch.
In each sc around, make a v stitch (dc, ch 1, dc)
12 v stitches total
Join in the middle of the first v stitch with a slip stitch
Round 3:
In the same stitch, dc, ch 2.
In the middle of each v stitch around make a dc, ch 2. (12 dc all total)
Join in the initial chain space with a slip stitch.
Round 4:
In the same ch sp, make 4 sc
In each ch sp, make 4 sc
Join in the first sc with a slip stitch
Round 5:
Now we’ll be making corners to make this into a square.
Chain 4, which will count as the 2nd dc in the first corner. The first dc will actually come at the end of the round. It sounds strange, but it keeps the square even and straight.
In the same stitch, make 2 dc.
*Make a dc in each of the next 11 dc from the previous round.
In the 12th stitch, (just above the dc from 2 rounds before) make 2 dc, ch 2, 2 dc*
Repeat from * to * across
When you complete the 11 dc in the last row of the round, you will actually go into the chain space of the corner from the previous round. Make a dc. This serves as the first dc of this round.
Slip stitch into the 3rd chain of the chain 4 at the beginning of the round. Slip stitch into the chain space.
Round 6:
Chain 4
2 dc into the corner space
*Dc in each of the 15 dc from the previous round. It’s easy to miss the first dc, so pull the dc from the corner space over to find it. See the video if that’s confusing.
In the next corner space, 2 dc, ch 2, 2 dc*
Repeat from * to * around.
After the final dc of the round, make a dc in the corner space from the previous round.
Slip stitch into the 3rd chain from the ch 4
Slip stitch into the corner space.
Round 7:
Chain 4
*dc in each of the 19 dc from the previous round
In the corner space, 2 dc, ch 2, 2 dc*
Repeat from * to * around
After the final dc of the round, make a dc in the corner space from the previous round.
Slip stitch into the 3rd chain from the initial ch 4 of the round.
Slip stitch into the corner space
Round 8:
Chain 4
*dc in each of the 23 dc from the previous round
In the corner space, 2 dc, ch 2, 2 dc*
Repeat from * to * around
After the final dc of the round, make a dc in the corner space from the previous round.
Slip stitch into the 3rd chain from the initial ch 4 of the round.
Slip stitch into the corner space
Continue making rounds, adding 4 dc for each row of the next round, until the square is as long as your armhole opening. (Top of shoulder seam to bottom of armhole opening.)
I made 9 rounds for an 8” armhole opening (size large).
I ended the last round with a slip stitch into the 3rd chain from the initial ch 4 of the round, cut my yarn, leaving a long tail, and made an invisible join. Please see the video tutorial if you need help with this.
You’ll be sewing 2 together to make a sleeve, then sewing those 2 into the armhole opening.
Final edging:
Row 1-5 (more or less as you like)
Beginning in the bottom corner of the left front panel, Ch 2
Hdc in each stitch around.
When you reach the bottom corner of the right front panel, ch 2,turn and hdc in each stitch around.
That’s it! I hope you enjoy this pattern and find is as useful as I do for the warmer months.
See the following chart from the Craft Yarn Council for women’s sizes XS-5X