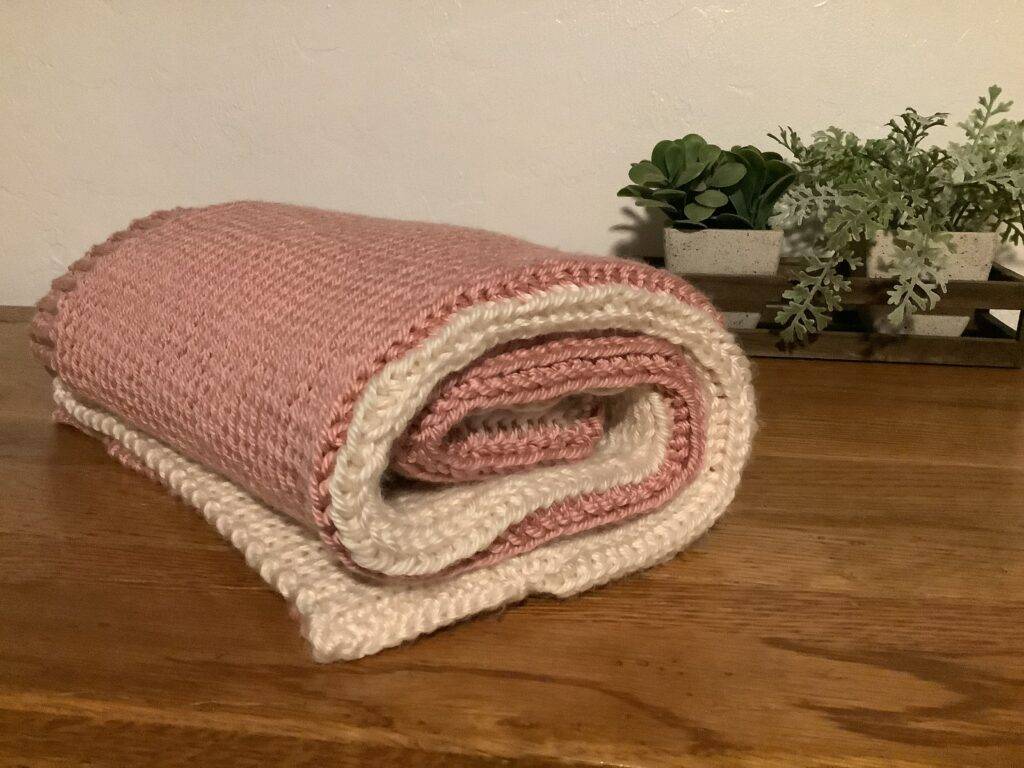
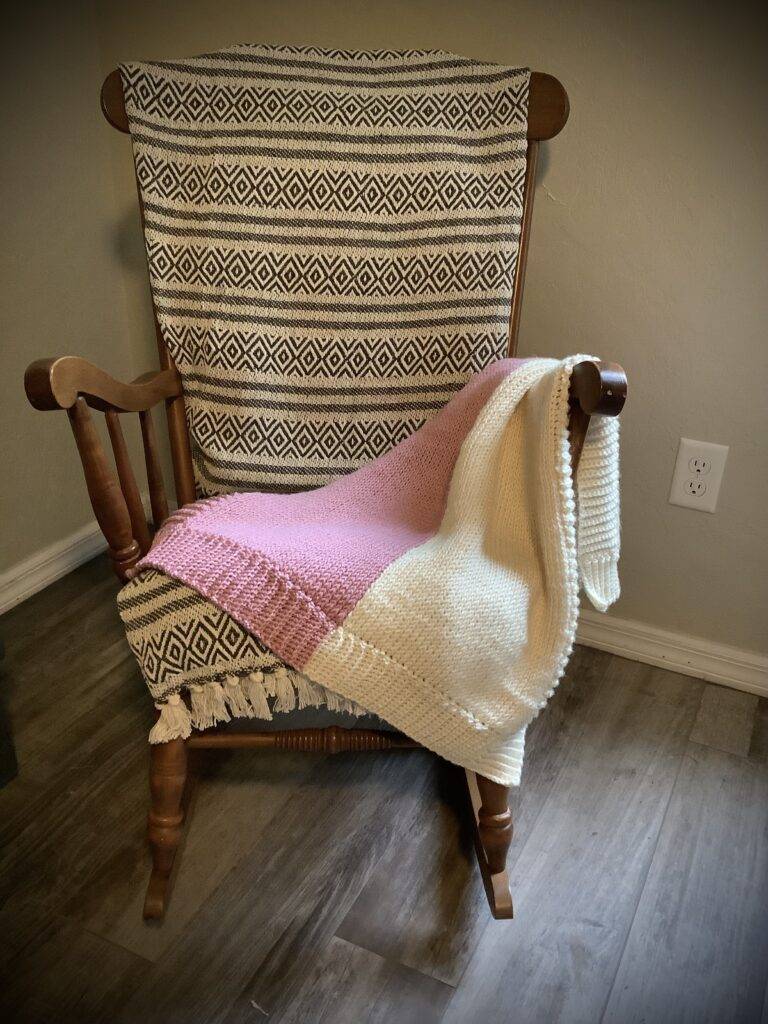
You can make this beautiful baby blanket that looks and feels like knit, but made with both Tunisian and standard crochet hooks!
I created the pattern for this beautiful two tone Tunisian knit-look crochet baby blanket because I wanted the look of a knit blanket, but I don’t knit. I find that the Tunisian knit stitch looks knit, but is much easier.
I’m Not Cut out for Knitting…
I admire those who can knit. If you knit and crochet, wow, my hat’s off to you! So many people in my family were knitters. My mother made gorgeous sweaters with intricate designs. She tried to teach me, but she was left handed and apparently I was purling when I thought I was knitting. I found it terribly frustrating and gave up knitting forever.
My sister taught me the basics of the art of crochet years ago. She is quite talented at making blankets with designs from graphs and I was sure I would never be able to accomplish those skills. I didn’t pursue going any further with my crochet skills until my husband and I were traveling and I wanted a creative outlet that didn’t take up much room in our RV. Crochet was the perfect solution.
Crocheting a Knit-Look Blanket is Easier than it Looks!
Since that time a few years ago, I’ve learned so much about the art of crochet from others. While browsing for a new pattern recently I stumbled on Tunisian crochet and found that I could actually crochet items that look knit with the Tunisian knit stitch! There are other stitches as well and all have unique textures. I was intimidated by the thought of learning a new type of crochet. With memories of failed attempts at knitting, I put it aside for awhile.
When I finally decided to give Tunisian crochet a go, I fell in love. It’s not difficult at all. In fact, in some ways it’s even easier than standard crochet and the return rows help the project to work up quickly.
Give Tunisian crochet a try and I’m quite sure you‘ll also fall in love with the ability to crochet items that look knit.
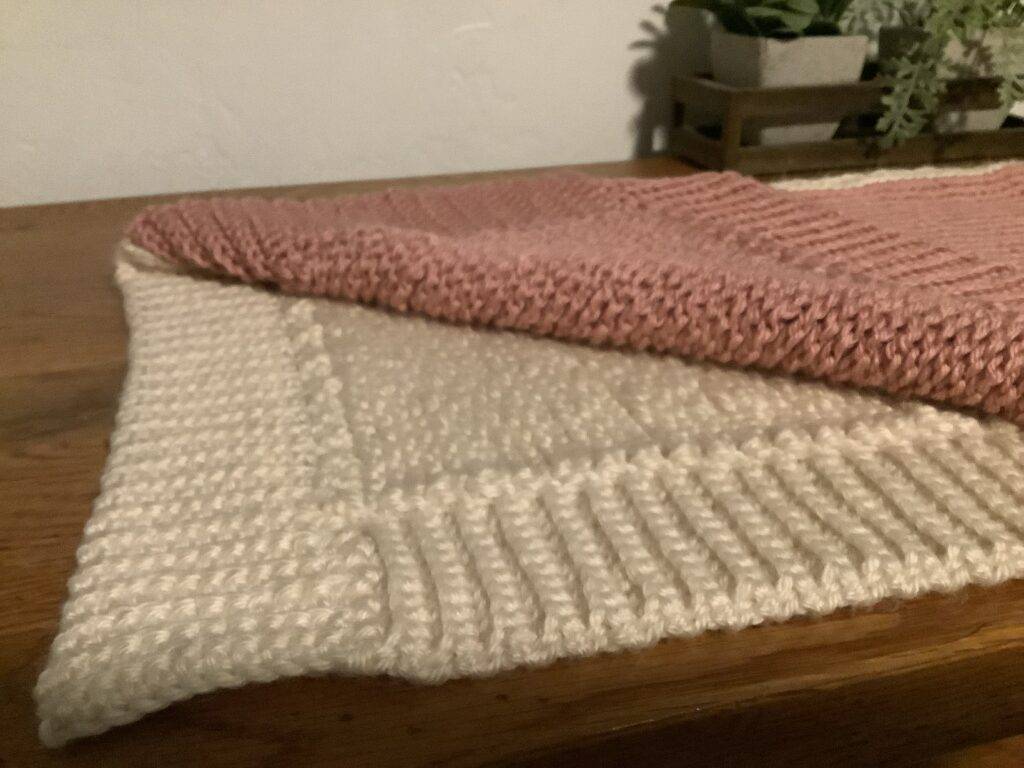
I used a standard 5.5 mm crochet hook to make the simple ribbed border.
The blanket is super soft with a nice, dense stitch and classic border, reminiscent of a sweater.
(Disclaimer: as an Amazon associate I may make a small commission on any recommended product you purchase through a link. Thank you!)
Materials I used:
Red heart soft #4 in rose blush and off white (approximately 236 grams of each color; 141 grams in each skein, about 1 3/4 skeins of each color (or 448 yards of each color). Whew! That was a lot of math!
With what’s left of each skein, you could make the matching baby headband.
5.5 mm crochet hook (My favorite hooks by Tulip)
Stitches used
Slip knot
ch-chain
ss-slip stitch
sc-single crochet
tks-Tunisian knit stitch
Blanket:
The blanket measures 25” wide by 32” high, including the border. Add more chains at the beginning to make it wider, more rows to make it longer. This is a good size for a newborn.
If you want your blanket to be larger, add more chains at the beginning. Just make sure you have the same number of chains of each color.
You can make this all one color, just follow the same directions without switching colors. It will still be beautiful!
Begin with color A:
Ch 35 , drop color A (don’t cut) then pull color B through and ch 35. (The loop you pulled through when you changed colors does not count as a chain.)
Row 1:
- put your hook through the back bump of the 2nd ch from the hook, pull the yarn through and keep the loop on the hook. Continue with all chains (keeping all loops on the Tunisian hook) across to color A. Drop color B.
Pick up color A and continue as above across the rest of the chains.
Row 2 (Return row):
- Return row, ch 1, yarn over, pull through 2 stitches, yarn over pull through 2, continue until you have only one loop of color A, drop color A and pick up color B. Continue the return row of pulling the yarn through 2 loops at a time. Tighten up the last 2 stitches to keep them even.
Row 3: (Tunisian Knit Stitch row)
- color B Tunisian knit stitch (tks) 34 (you already have one ch on your loop from the beginning, so you’ll have 35 loops) Make sure you go under color A when making the last tsk of color B) drop color B, pick up color A, : watch the video if you don’t know how to make a tks)
- Continue the tks with color A. Make sure you go in the full stitch at the end and ch 1.
- Repeat Row 2 (tks row) and Row 3 (return row) until your blanket is 28” long (or however long you want it before the border)
Ribbed Border:
- switch to 5.5mm regular crochet hook, single crochet in each knit stitch (switching colors just like the tks rows, or keep it all one color)
- If using 2 colors for the border, at the end of color b, Pull up a big loop, drop and leave color B for now.
- Pick up color A, yarn over, go through the first knit stitch and make a sc. Sc across the top in each knit stitch. When you reach the corner, ch 1, go down the side with a sc in each stitch, at the corner, ch 1 and sc across until you reach color B.
- Pull up a big loop and leave color A for now.
- Go back to color b. *Chain 12, sc down the chain to border (11), ss next 2 stitches in edge of the blanket, turn, sc blo, up into the sc’s you just made and sc in both loops at the top. Make sure you count the 11 stitches. It’s easy to put one too many stitches in. Ch 1, turn, sc blo down (11), ss next 2 stitches.*
- Continue from * to * pattern until you reach the corner. (Each corner is worked the same)
Corner:
- Once you reach the corner, sc blo to the top of the row, but instead of coming back down, ch 12, you’ll now be making the same sc ribbed border along the next edge. Repeat the ribbing pattern from * to * until you reach the next corner and repeat the the corner instructions.
Meeting up with color A:
- When you reach color A, complete the last drop color B and complete the ss with color A. Work sc into the blo of the last color B row. Sc into the blo of the top stitch as well. This is the only row that will use blo in the top stitch going up the row)
Last row:
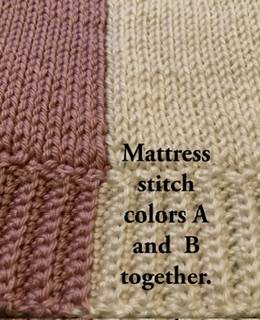
- When you meet up with color B, complete the last 2 ss, cut your yarn, leaving a long tail for sewing. Thread your darning needle with the tail. Turn the blanket to the right side.
- Work a mattress stitch in the back loop of color A and the front loop of color B. This will push the stitches forward and you won’t see the seam at all.
- Fasten off (make a ch and pull through tightly or do an invisible join) and weave in the end.
You may need to block the edges with just a little steam and press them in place with your fingers. Do not touch an iron to the yarn. You can also wash it and flatten it while damp.
I hope you enjoy making this beautiful knit-look crochet blanket!
Check out my shop if you’d like to purchase the blanket while it’s available


